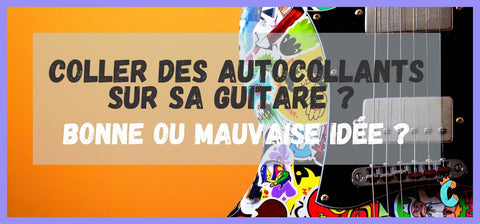


How to decorate a car with Stickers?
of reading
1. Getting started: choosing the area and sticker packs.
To make this article, the StickyStickers team used the Mini Cooper Countryman S of one of the new members of the team called Arthur. It's a must when you join the StickyStickers team so he couldn't escape it.
On the other hand, he wanted to decorate his car without exaggerating.
We therefore focused on a single part of the car, so as not to distort it with a surplus of stickers.
The idea being to bring a decorative touch to the car, we opted for the small rear spoiler above the trunk which is about to be customized.

For the choice of stickers, we opted for two very complementary packs in colors and style
- The pack of Dragon Ball Noir Stickers (100 pieces): available by clicking here
- The Star Wars Stickers pack (108 pieces): available by clicking here

These two sticker packs have vintage punk rock influences perfect for bringing a funky edge to our car decor without overdoing it.
In addition, being vinyl-coated stickers, they are more resistant to outdoor conditions such as sun or rain than traditional paper stickers, which will make our wrap more durable over time.
2. The material we used for the Covering
We have kept it simple in the use of tools for this Sticker Bombing of the Mini Cooper Countryman S. We wanted to show you that it doesn't take much to do a professional job!
To do this, here are the elements we used:
- 2 packs of stickers mentioned above
- A household spray
- A sponge
- A cloth
- A cutter
- A car

What we haven't used but strongly recommend you have for a perfect Covering that lasts over time and keeps its colors:
- A small soft plastic squeegee for air bubbles (here we used our fingers). You can get it at any big DIY store.
- A protective spray: we recommend that of the site www.mania-auto.com called "Carbon Flex Vitalize Spray Sealant". You can access their site by clicking here .
3. Cleaning the surface to be bonded for better adhesion
Before you begin to apply your decals, it is imperative to thoroughly clean the area of any dust or dirt. If this was not done beforehand, this would greatly alter the duration of your Sticker Bombing.
Use a household spray and then give it a good wipe with the sponge to remove the residue.


Remember to dry the surface with a cloth. Indeed, you do not want to stick your stickers on a wet surface, otherwise the stickers will not stick sufficiently on the car.

4. Mini Cooper Countryman S wrap steps
A. Outlines
Start by sticking your stickers on the edges of the surface you have chosen to personalize. This will then allow you to continue inside, which will make customization much easier.

In order to perfectly match the contours of the bodywork, we opted for the overtaking technique. The idea is to place your sticker half on the surface and half in the air. Once the gluing is finished, we will then cut the excess.
B. The first layer
Try to use your least favorite stickers as much as possible to keep your favorites visible on top.
The trick is to stick the stickers randomly inside the contours previously made. This will allow you to fill the bottom of your Covering.

C. The second layer
Now is the time to use our favorite stickers to finalize our Sticker Bomb.
To do this, we start from the stickers scattered on the bodywork in order to join them to each other until the entire area is filled.

D. The final touches
Once our surface is covered, it is imperative to look for potential gaps between the stickers. These small holes should be avoided as much as possible, because dust could easily hide there, and this would alter your Sticker Bomb.

Believe us, you will inevitably find some. Once these areas have been identified, all you have to do is stick a sticker over them to close the hole.

E. Smoothing stickers to remove air bubbles.
In order to obtain a smooth and flat surface, you will have to get rid of potential air bubbles or slightly peeling stickers.
You can use your fingers or a small plastic squeegee as explained above. All you need to do is press and smooth the stickers by going over them several times.
5. Tip: use a cutter to outline and cut off the excess
In order to cut out the stickers that we had stuck between the void and the bodywork, we used a cutter as shown below. We just walked around the fin very carefully.

It is imperative to be thorough and patient so as not to scratch the car.
Take your time, the result is worth it.

6. Important: finalize the Sticker Bombing with a clear varnish spray
In order to seal your stickers and protect them even more from UVs and rain, we strongly recommend using a clear varnish spray, which you can easily find on the internet or in a DIY store for around 5 € .
In the team, we all use the spray from the site www.mania-auto.com called "Carbon Flex Vitalize Spray Sealant". You can access the product by clicking here . It costs €29.95
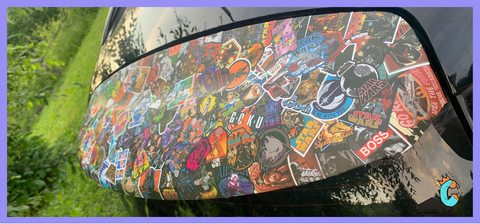
7. The final result of our Sticker bombing on the Mini Cooper Countryman S

There you go, our little project is over and honestly we think it's great!
The time spent to perform Sticker Bombing
All in all, we worked 2 hours to make this customization. between the choice of stickers, the cleaning of the bodywork and the gluing: laughter, patience and precision were at the meeting.
In addition there is a super nice and very playful DIY side and Arthur from the lesStickyStickers team is super happy with the result.
The price: we used 2 packs of 100 stickers for a total price of 25.98 euros. You can also get 15% off by using the Promo Code MINI15.
So, for this wrap, it cost us 10 to 100 times less than a specialized wrap and we kept all the fun for ourselves.
8. The little touch of the end
We had from the beginning set aside a sticker to put it under the logo of the car once our sticker bombing was finished.

So here we are, ready for a trip to the very, very distant Star Wars galaxy with our spaceship-like Mini Cooper Countryman S...
We hope this article will give you ideas for your next Sticker Bombing projects.
If you have any questions or an opinion to share, do not hesitate to comment on this article or contact us by email at info@les-sticky-stickers.con
May the force be with you on the roads of France this summer!
Peace, Love and Sticker Bombing
The StickyStickers team